Photoshop for beginners!

So I was talking with few guppies who are illiterate in photoshop like myself and we were thinking that it will be great if our fellow guppies who are skilled in photoshop can give tutorials, tips, etc to all those beginners who have questions, concerns, and need assistance in photoshop.

I have seen lot of amazing photoshop work by lot of guppies in this forum and image gallery and I hope all you photoshop skilled guppies will be open to help other who need assistance. :cheegum:

I think this thread can be a great resource. So people shoot your questions and concerns to our skilled guppies and others feel free to share your tips and tricks… :cheegum:

Re: Photoshop for beginners!

that will be a great help lusi. here is the link for photoshop tutorials

Popular photoshop Bookmarks on Delicious

I started from Photoshop 7.0 and I think this version is best for the beginners and easy to learn :blush:

Texts with Colors (Animation)

I learned this tutorial from one of my friends, let me share it with you people with the screen shots :slight_smile:

http://img144.imageshack.us/img144/36/50012096qj3.gif

Re: Photoshop for beginners!

Thanks a lot Elegance.
please share more :)

Re: Photoshop for beginners!

this is kool elegance:D

Create Brushless Background

http://img98.imageshack.us/img98/9136/4h24129oh5.jpg

Re: Photoshop for beginners!

The best way is to play with it. If stuck then ask. I am sure some1 will help us out hehe.

Re: Photoshop for beginners!

one must need alot of time in hands.

Re: Photoshop for beginners!

Elegance, these are awesome. Thank you, these tutorials seems easy to follow. Keep them coming. :cheegum:

Re: Photoshop for beginners!

yeah Lusi is right. they are very easy for anari people to follow and then we can continue with our own experiments :)

Re: Photoshop for beginners!

^^ Feel free to post results of your experiments :cheegum:

Thanks peepz

I have many other tutorials to post and InshAllah I will plus the purpose of this thread would be completed when you all post your experiments aswell.

Now I am going to post something which I was supposed to post earlier. It’s an introduction of the 'Tool Bar’ in Adobe Photoshop. It will help you to know the purpose of every tool. The tool bar is at the left side of the photoshop.

ok guys this is what i did :slight_smile: . try both things posted by elegance and combine them :smiley:

Re: Photoshop for beginners!

Good Job Sheal thumbs up that was a very brilliant work :)

awwww thank you elegance :hug:

keep posting the basic things :slight_smile:

** Make a Custom User Bar **

1) Make a new document with sizes [width:350 x height:19 ] and having a transparent background.

2) Make a suitable gradient and apply it.

**3) Now get a logo, search in Google Images, find your logo and open it up in Photoshop.

  1. Now it’s time to remove your logo from the background, get the polygonal lasso tool and carefully cut it out.

**

**5) Now go to Edit > Copy, then open the user bar document (the one where you applied a gradient), then create a new layer

and go to Edit > Paste.

  1. Now with this layer selected go to Edit > Transform > Scale and resize your logo or reposition it if you wish.**

**7) Now right click on the layer and select Blending Options and give it a little outer glow with these settings:
**

8) Now make a new layer and get the Elliptical Marquee Tool and drag it from about point 1 to point 2.

9) Now get the Gradient Tool and use these settings:

and now drag it vertical from point 1 to point 2:

**10) And now you have a nice light effect, create a new layer and fill it with a 45 degree scanline with opacity from 10% - 15%
if you don’t have a 45 degree scanline make a new document with dimensions 3x3 with a transparent background and do a

maximum zoom,now get the pen tool (make sure your color is set to black) and draw what is done in this picture:**

**When you are done go to Edit > Define Pattern and name it what you want and click ok.
Now you can close this document because the pattern is permanently saved in Photoshop.

Here is what you should have so far:**]

11) Now it’s time to put some text, We will use font Visitor which you can get below in the attached files
type your text then right click on your layer and go to Blending Options and use these settings:

Here is what we have so far:

**12) Now for the final step is to add a border, create a new layer and hold CTRL and click on the bottom layer. You should have the “running ants” around your document, now go to Edit > stroke and use these settings then click OK:
**

And now you are done!
Here is the final result:

**Brief Introduction to Photoshop
**

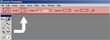
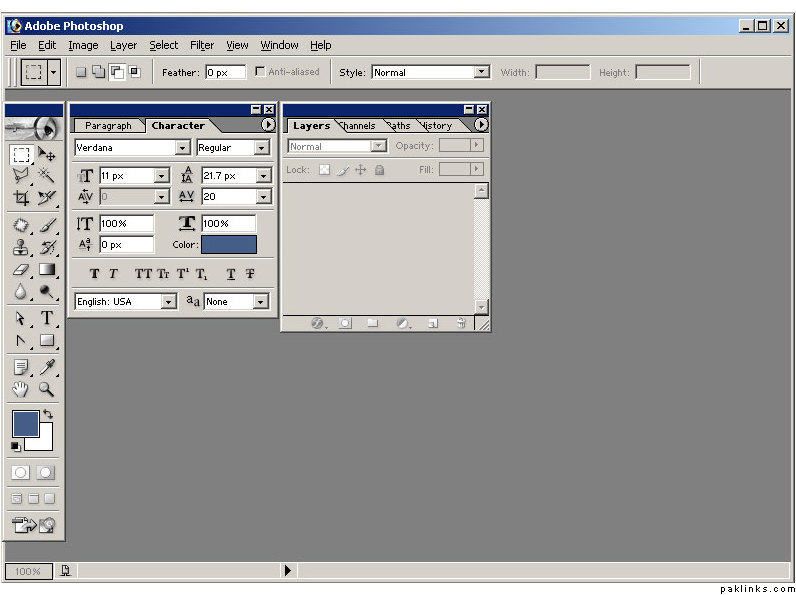
Here is the screenshot of Photoshop Interface:

Tools and Options Panel

Open your Photoshop. If you don’t see Tools Toolbar already then go to Window > Tools

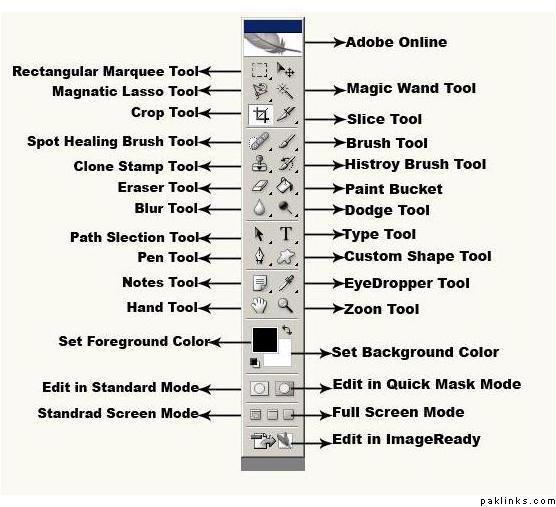
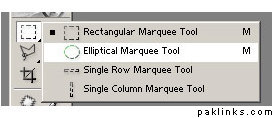
Below is the screenshot of the** Tool**s panel. If the tool has a small trianlge at the bottom corner it means it has more than one tools. To see these options just click on the tool and hold your mouse for a few seconds, and you will see the options on the popup window as shown below.

Let’s go through one tool from each group and their functions. The letters inside the brackets are the shortcuts for the particular tool, when you are in Photoshop and press **V **for example it would select the Move Tool.

Move Tool (V): Is used to select and move images (objects) on any active layer.

Rectangular Marquee Tool (M): It is used for making selection on the image (objects) on any active layer.

Magic Wand Tool (W): Used for making selection (similar colors at once for example)

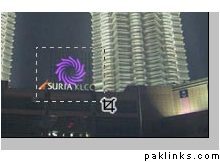
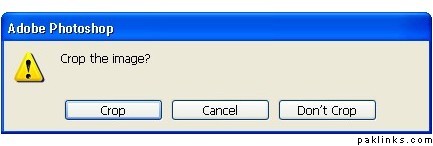
Crop Tool (C): Used for cropping images

Polygonal Lasso Tool (L): Used for making free selection as you go.

Slice Select Tool (K): Used for selecting slices

Patch Tool (J): Used for correcting images

Brush Tool (B): Used for drawing freehand

History Brush Tool (Y): Used for restoring specified history state

Clone Stamp Tool (S): Used for selecting a source and copying (drawing) it in another place

Gradient Tool (G): Used for making gradient effect on images

Eraser Tool (E): You are right, this tool is used for erasing :wink:

Dodge Tool (O): Used for making images lighter (And Burn tool makes the opposite - darker)

Horizontal Type Tool (T): Yes used for inserting text to image

Path Selection Tool (A): Used for selecting the active path

Custom Shape Tool (U): Used to insert pre-specified (ready) shapes to image

Pen Tool (P): Used for creating vector shapes

Eyedropper Tool (I): Used for selecting color

Notes Tool (N): Used for inserting notes on the image

Zoom Tool (Z): Yes used for zooming in or out

Hand Tool (H): Used for dragging image when you are in the zoom in state

Options Panel

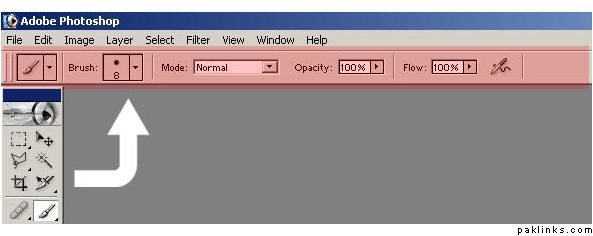
As you see below from the screenshot below, Options Panel is highlighted with light-red. Whenever you switch from one tool to another,** Options Panel **will change accordingly. Currently as you can see Brush Tool is selected in the Tools panel, and in the Options Panel you can see the properties of the Brush Tool, namely : Brush Size (Type), Mode, Opacity and Flow.

Just remember to look up to the** Options Panel** when you choose a particular tool, because sometimes if something is selected or unselected in the Options Panel, you might not be able to use that particular tool properly. For example Opacity of the color might be set to “Zero” in the Options Panel, in that case anything that you draw would not show up since 0 means invisible.

**Brief Introduction to Photoshop
**

Cropping

Open any image in your Photoshop. Select the **Crop Tool ****(Press ‘C’ to Select or Select it with your Mouse) **and draw a selection on your image as shown below. (To make a selection click and drag with your mouse)

Make a selection

After you made your selection press Enter

Result

Cropping images is actually that easy in Photoshop, just select the area you want to keep and press Enter on your keyboard, and you are done. You can also press on the Move Tool instead of pressing **Enter **on your keyboard, it will prompt you a window similar to the one shown below. If you are satisfied with your selection just press on the **Crop button **and your image will be cropped.

Copying & Pasting

Open any image in your Photoshop. Select the **Rectangular Marquee Tool (M) **and make a selection on the image as shown below.

Make a selection and press **Ctrl + C **or
go to Edit > Copy

Presss **Ctrl + N **to open a new window or
go to File > New and press OK

And now press **Ctrl + V **to paste the copied image or go to
File > Paste

Whenever you make a selection on the image and copy that area, Photoshop automatically saves the dimensions of that selection in its memory. Thus when you open a new window, dimensions of the image will already be in the Width and Height fields.

Image Adjustment

Go to Image > Adjustments. You will see the menu as shown below.

Go ahead and try some of the effects on your image, try to change the Brightness/Contrast, Auto Color…etc. Sometimes using Photoshop’s pre-defined Image Adjustment options will solve your problem, try using Auto Levels, **Auto Contrast or Auto Color **on your photos before you proceed with other options.

Re: Photoshop for beginners!

Next time I will post 'Working with Text' and 'working with Layers'.

Nice Sheal! Even paklinks is blinking :smiley:

Keep your experiments coming! :cheegum: