![]() now the next experiment will come after 3rd sept as i am having my finals
now the next experiment will come after 3rd sept as i am having my finals ![]()
Introduction to Photoshop
Working with Texts
Open a new window Ctrl + N (choose a bigger dimensions for the window; width 400 and height 300) and press OK
Select the Horizontal Type Tool (T) and click on the window that you just opened and type something.
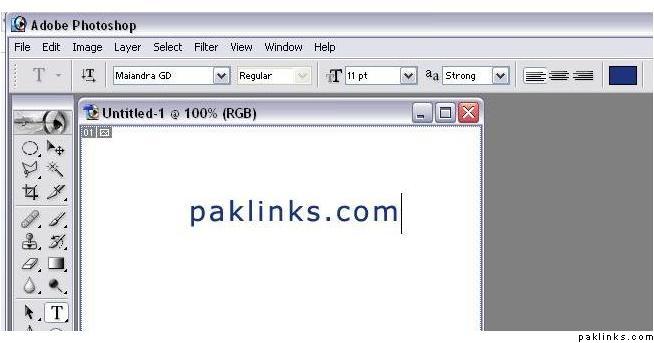
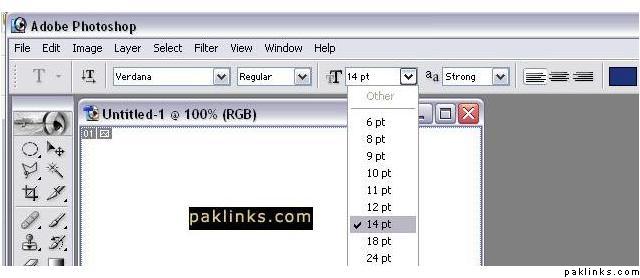
If you want to make changes to your text, highlight it and change the properties from Options Panel
After you are done making changes click on the Move Tool (V) and by clicking on your text position it on the top left corner of the window.
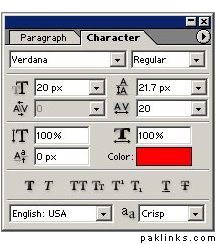
There is another way to change the properties of the Text, in addition to the Options Panel we have discussed and that is by using Character Panel. If you don’t see the Character Panel go to Windows > Character to bring up the Character Panel.
Below is the Character Panel screenshot, if you change any of the properties in this window it will be reflected on your text. However for it to be effective you need to be on the correct layer, otherwise you will not see any changes on the text. Layers will be our next discussion.
Working with Layers
Photoshop uses “Layers” for managing multiple (separate) objects in the same file, to open your Layers Panel go to Window > Layers. If you have used other image editing programs that use the same “Layers” concept. Then this should be familiar to you. If you haven’t then it’s an easy concept to understand, just think of the Layers as a “Stack of Books” on the floor, and imagine yourself as looking at this stack of books from top.
Firstly, when you look at this stack from top, you will be able to see the cover of the first book which is on top of all the other books without a problem, however when you try to see the cover of the second book that is below the first book, you will notice that most of it are not visible to you. Because it’s being blocked by the first book. And when you look at the third book’s cover it will be even more hidden from your eyes. So think of Layers in Photoshop as a Stack of Books, one layer representing one book or level in the stack.
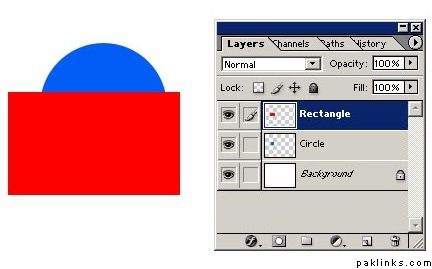
Layer that is on top
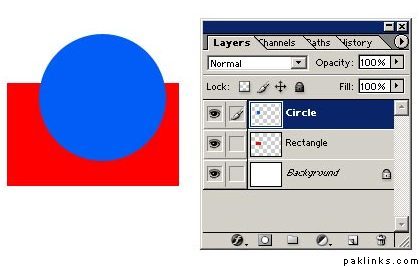
As you can see from the image above, the blue circle is located on the Top Layer, I have named the Layer as “Circle”, and red rectangle is on second layer, I have named this layer as “Rectangle”. As we have discussed earlier, book that is on top of the stack will cover the layers below. Thus you see the Circle covering Rectangle. And our background is a white color which is visible from the sides of the circle and rectangle.
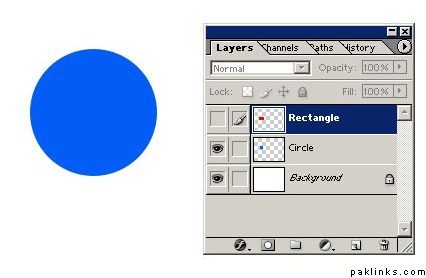
Changing layer positions
Here I have moved Red Rectangle to Top, as you see now Red Rectangle is on top and it covers the** Circle.** To move the particular layer just click on it with your mouse and while still holding your mouse move it up or down. Or you can click on the Layer that you want to move and use shortcut keys on your keyboard to move it up ( Ctrl+] ) and down ( Ctrl= ).
What is Active Layer
Active layer is the layer which you are working on, for example from the image below we can see that the Active Layer is the** Rectangle** Layer - active layer will always be highlighted (selected).
he “Eye” icon on the left of the layers means that the layers are currently visible, if you toggle them off then the object will also dissappear (will become invisible) from our window.
As you can see from the screenshot above, I have deselected/removed the eye icon from the layer Rectangle. We still can see the rectangle in the **Layers Panel **but it is not visible on our image - we can only see the blue circle.
Saving for Web (as JPG or GIF)
After you have completed your work I believe you would want to save it as .jpg or .gif (or any other format that Photoshop supports)
To save your image for web go to File > Save for Web or press Alt+Shift+Ctrl+S and you will see an identical window like this one below.
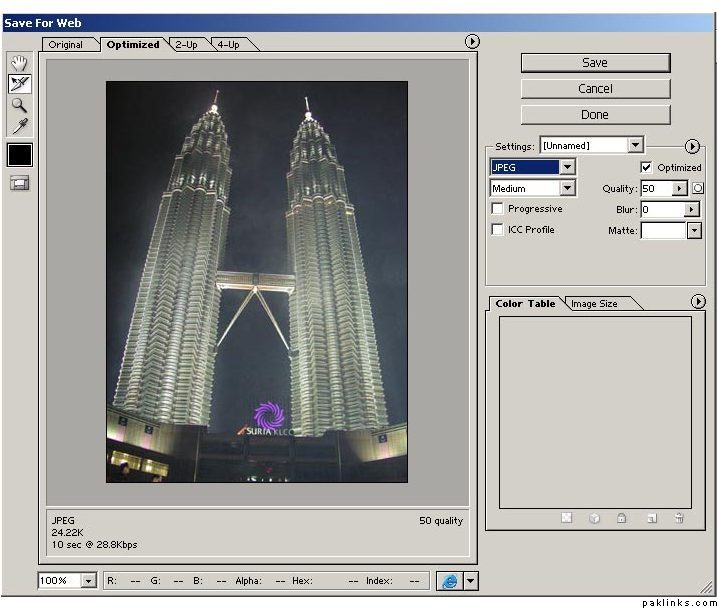
From here you can change the image type to** JPG, GIF, PNG and WBMP**. You can change the quality of the image as well, the higher the quality the bigger the size will be,
i did try this as well but stuck on this point :(. so i leave this.
and how can i open these options for gradient
Re: Photoshop for beginners!
^ Just right click layer pe and choose Blending Option
Re: Photoshop for beginners!
elegance i'm waiting for more lessons.... :@:
Gul please share the tips and tricks of making greeting card and they way u do the poetry with images.
Re: Photoshop for beginners!
Great thread :k:
Can anyone pls also share experiences tips and support on restoring/colouring old and B&W photographs.
Sheal kahaN tak aap ko aata hey? uss k next part sey meiN tutorials tayaar karney ki koshish karuN gi ![]()
its very easy in photoshop
Re: Photoshop for beginners!
GUL i need to know the basics only. for advance things there are so many tutorials on net.
just post simple basic things or just one on how u did AQs poetry with images :)
Sheal meiN next time agar AQ’s ki koi Poem Design karuN gi tou meiN saath saath Tut tiyaar kar luuN gi, because aik image bananey k liye 5-6 hours lagtey heiN ![]()
Re: Photoshop for beginners!
Thanks Sheal:-)
By the way do you have Inpage, or Kelk , iss ki aapko zaroorat paRey gi, nahi hey tou meiN de dooN gi :-)
Re: Photoshop for beginners!
wow.. you lot are so creative.. but i can't learn until i see someone doing it :(
Thanks Sheal:-) By the way do you have Inpage, or Kelk , iss ki aapko zaroorat paRey gi, nahi hey tou meiN de dooN gi :-)
i have inpage. but its better if u send me again cauz some fonts are missing in that.
wow.. you lot are so creative.. but i can't learn until i see someone doing it :(
thats the problem with me too but i am trying to learn it :(
Re: Photoshop for beginners!
hi, im taking a photography class which requires the use of photoshop. we hv a simple test tmrw; the teachers going to give us a picture
and we hv to remove the phone booth and poles with it. any ideas as to what is the best way of going about this??
^
Use Clone stamp and blur tool ![]()
Re: Photoshop for beginners!
man photoshop cs3 that i am using is soooo different than what elegance posted! gd thing is we are doing photoshop projects in class this semester anyways so am cool!! :D infact i am in class right now lol
Re: Photoshop for beginners!
some keyboard shortcuts i use VERY often for photoshop:
ctrl+shift+i = invert selection, ie whatever is not selected is now selected. (SELECTION is shown with a dotted line around the selection)
Del = delete selection, ie make transparent
Alt+Del = Fill selection or Text layer with foreground colour.
ctrl+Del = Fill selection or Text layer with background colour.
ctrl+[click layer preview image] = selects layer outline, very handy, especially for text.